
Thinking about transforming your dark basement into a bright, usable space, but hesitating at the thought of the project itself? You’re not alone. The fear of a leaky installation, causing foundation damage, or simply choosing the wrong type of window can be paralyzing. Add in the confusion around building codes, especially for egress requirements, and it’s no wonder many homeowners put it off. We understand these concerns, and we believe that the project to install new basement windows should bring you peace of mind, not new problems.
At Window Galaxy USA, our commitment is to provide a stress-free experience from start to finish. We keep our promises, and our promise with this guide is to deliver clarity and confidence. We will walk you through every critical step, from selecting a durable, energy-efficient window to understanding when a DIY approach is feasible and when to call in a professional. By the end, you’ll have the expert knowledge needed to create a dry, secure, and beautifully lit basement, knowing the job was done right.
Key Takeaways
- Before you begin, a clear plan is essential for defining your goals-whether for more light, better airflow, or a safe emergency exit.
- The process to properly install new basement windows requires professional attention to leveling, securing, and creating a perfect initial seal.
- The final finishing touches are critical for creating a completely watertight barrier that protects your foundation and improves energy efficiency.
- Understanding common installation pitfalls will help you avoid costly mistakes like water leaks and drafts, ensuring a successful project from start to finish.
Before You Begin: Planning Your Basement Window Installation
A successful home improvement project always starts with a solid plan. Before you install new basement windows, it’s essential to assess your goals and understand the unique challenges involved. Are you hoping to bring in more natural light, improve ventilation, or create a code-compliant emergency exit? Each objective influences the type of window and installation method required. Basements present specific hurdles, such as managing moisture and accounting for soil pressure against the foundation. Establishing a realistic budget that covers the window itself, all necessary materials, and potential professional labor will ensure your project proceeds smoothly from start to finish.
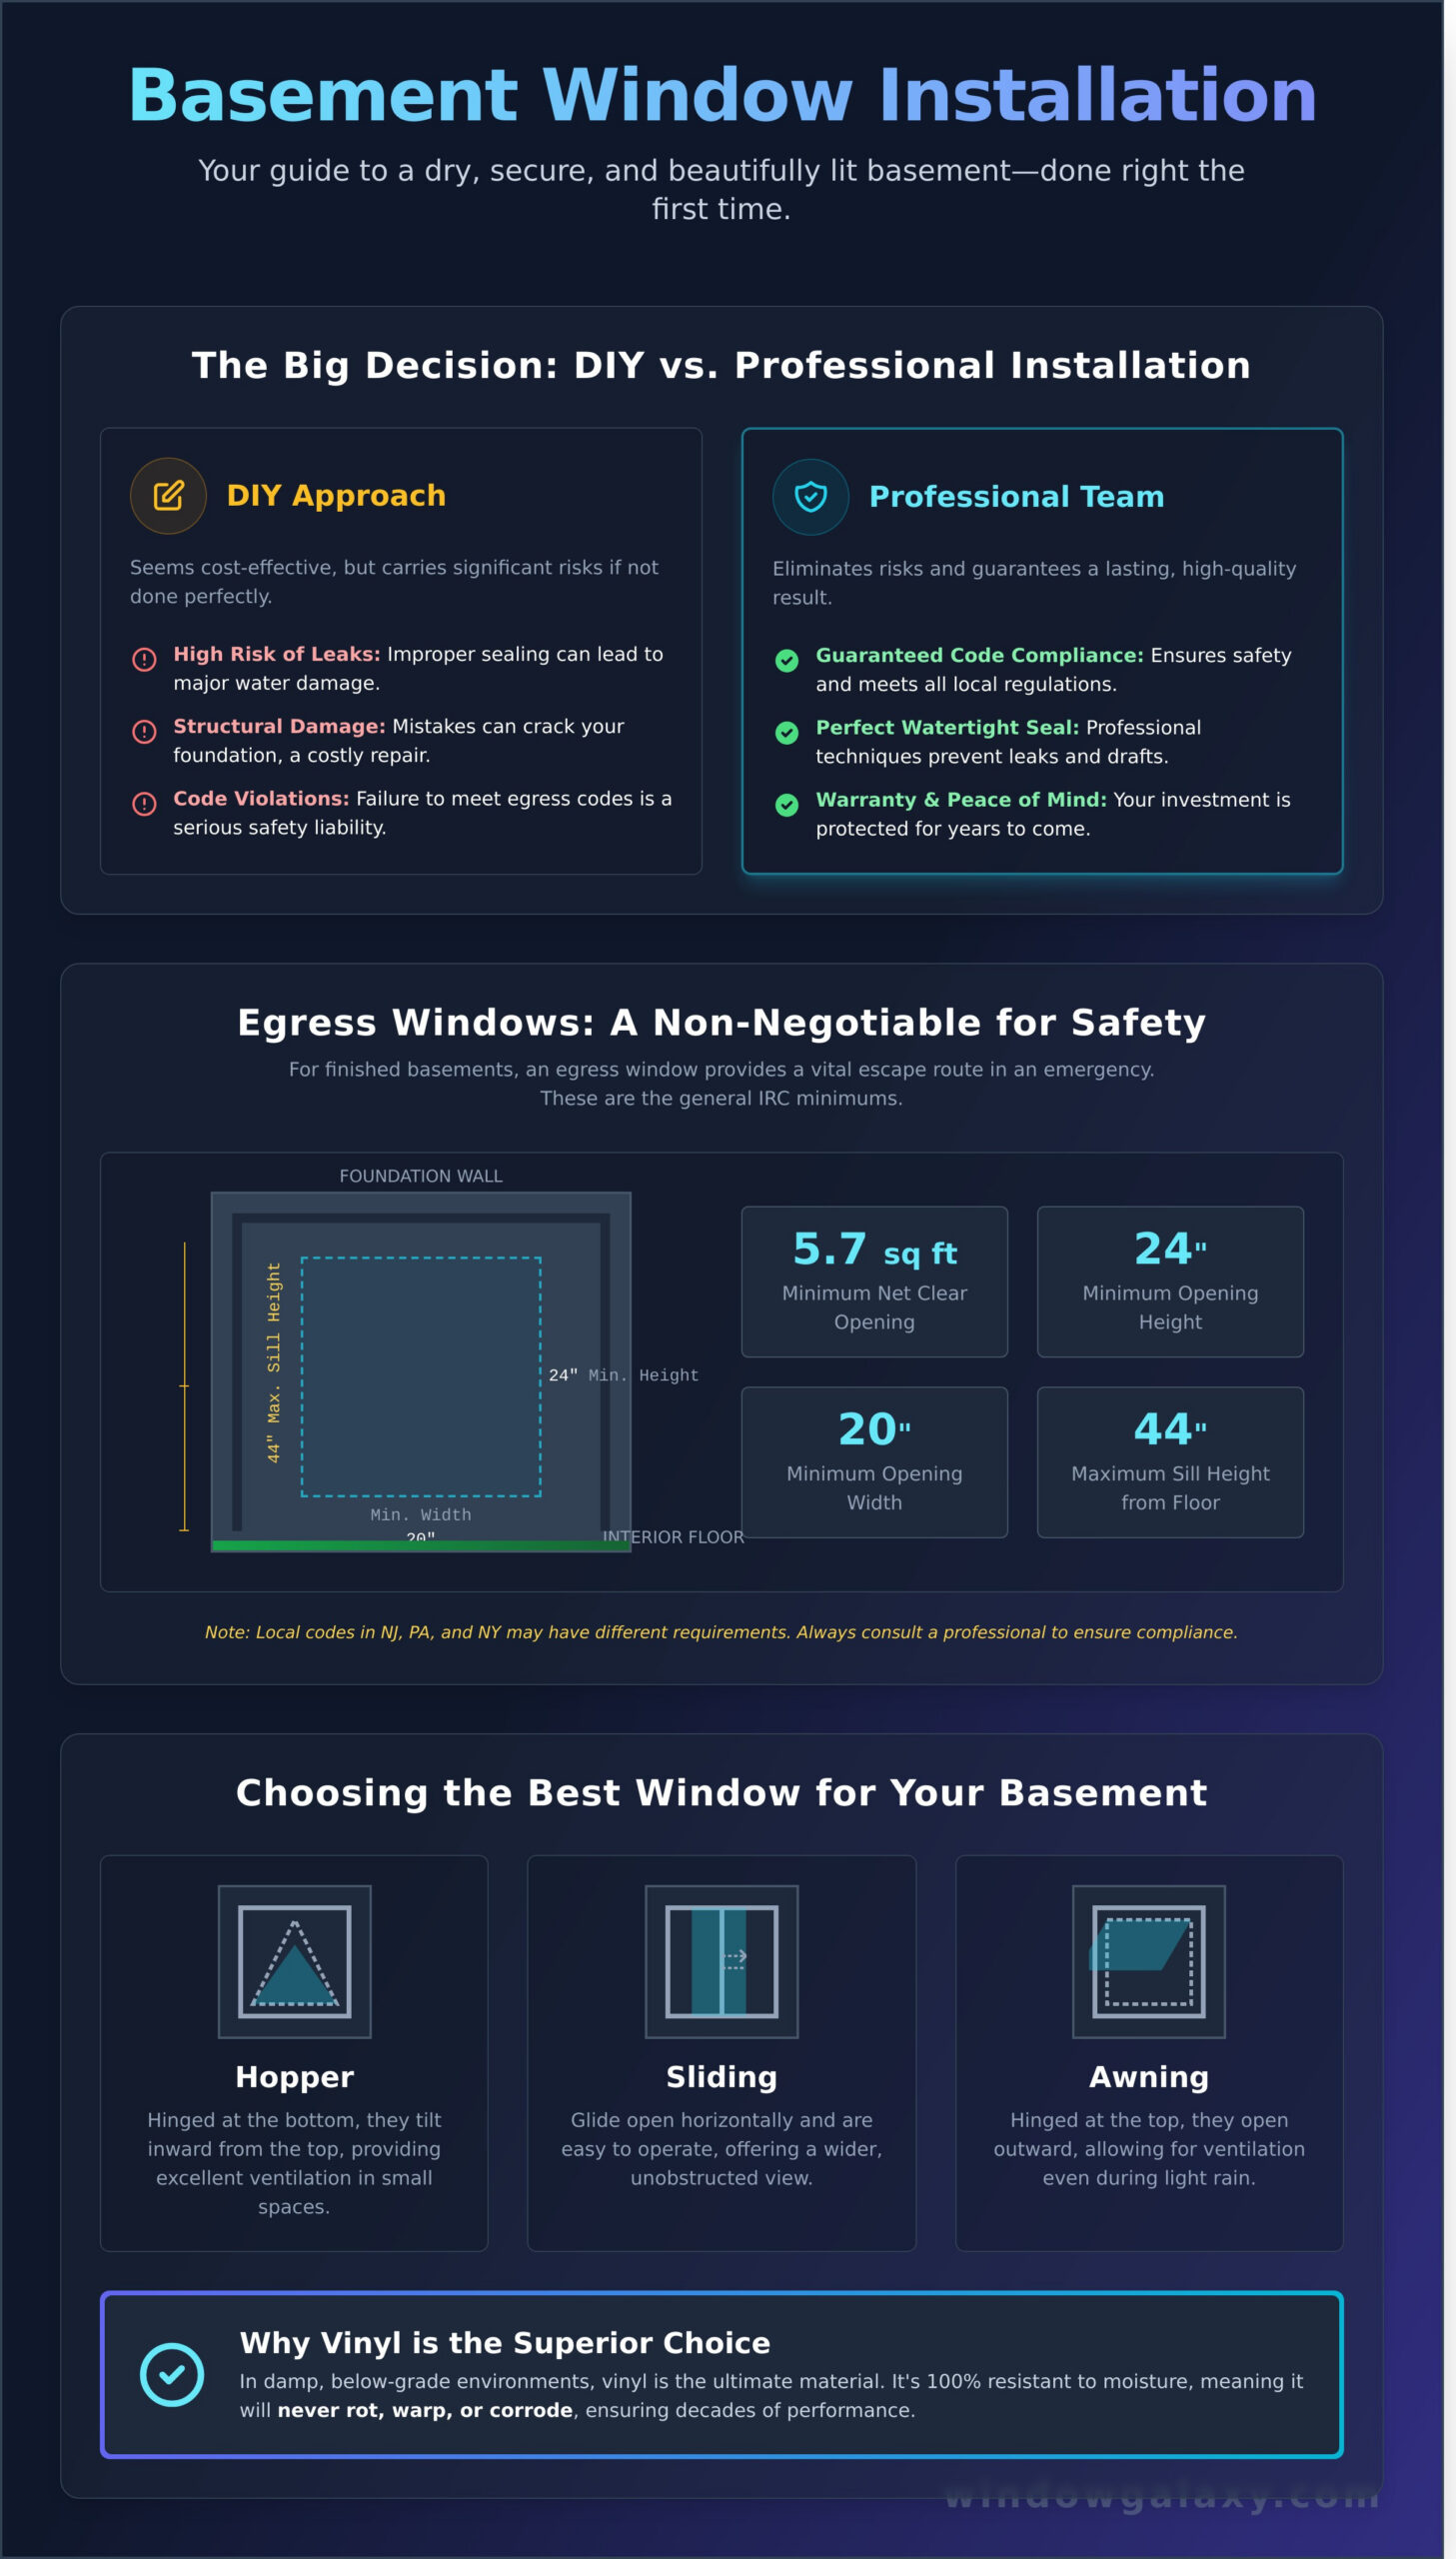
DIY vs. Hiring a Professional: Making the Right Choice
Honestly assessing your own skill level, available tools, and time commitment is the first step. A DIY installation can seem cost-effective, but mistakes can lead to serious consequences like water leaks, structural damage, or code violations. Hiring a trusted professional eliminates these risks. With an expert team, you receive guaranteed code compliance, professional-grade workmanship, and a warranty for total peace of mind. We handle the entire process with precision and care, delivering a stress-free experience and results that last.
Understanding Egress Window Requirements
If your basement is a finished living space, an egress window is a life-saving necessity. It’s designed to be large enough for a person to exit in an emergency. The International Residential Code (IRC) has specific minimum requirements for opening size and sill height. However, local building codes in states like New Jersey, Pennsylvania, and New York often have amendments. Navigating these regulations can be complex, but consulting with a professional ensures your new window meets all current safety standards, protecting your family and your investment.
Choosing the Best Window Type for Your Basement
Selecting the right type of Window is crucial for both function and durability. For basements, a few styles are particularly well-suited to the environment:
- Hopper Windows: Hinged at the bottom, they tilt inward from the top, making them ideal for providing excellent ventilation in small spaces.
- Sliding Windows: These windows glide open horizontally, are easy to operate, and offer a wider, unobstructed view.
- Awning Windows: Hinged at the top, they open outward, allowing for ventilation even during a light rainstorm.
For any of these styles, we strongly recommend vinyl frames. Vinyl is a superior material for damp, below-grade environments because it is completely resistant to moisture, meaning it will never rot, warp, or corrode.
Step 1: Removing the Old Basement Window Safely
A successful project to install new basement windows begins with the careful and professional removal of the old unit. This initial step is foundational; it sets the stage for a perfect fit, a weatherproof seal, and long-lasting performance. Rushing this process can lead to damaging the foundation, creating an improper fit for the new window, and causing frustrating drafts or leaks down the road. Our process prioritizes precision and care from the very start.
Before you begin, safety is the absolute priority. Always wear the proper personal protective equipment (PPE) to guard against dust, debris, and sharp edges. This includes:
- Heavy-duty work gloves to protect your hands.
- Safety glasses or goggles to shield your eyes from flying particles.
Preparing the Work Area
A clean and organized workspace is a safe and efficient one. Start by clearing a space of at least five feet around the window on both the interior and exterior of your home. Lay down heavy-duty tarps or drop cloths to catch dust and debris, which will make cleanup significantly easier. If your window is at or below grade, you may need to carefully excavate any soil, mulch, or gravel away from the outside of the window well to gain full access to the frame.
Taking Out the Old Window Frame
The method for removing the old frame depends on its material. For older wood frames, the process typically involves prying out the window sash first. Once the glass is safely removed, you can use a reciprocating saw to cut through the wood frame in a few places, making it easier to pry out the pieces without damaging the surrounding concrete. For steel frames set directly in concrete, removal is more demanding and often requires a grinder with a metal-cutting wheel or a masonry saw. After the main frame is out, carefully use a hammer and chisel to chip away any remaining mortar or old sealant.
Inspecting and Cleaning the Rough Opening
With the old window gone, you have a clear view of the rough opening. This is a critical moment for quality control. Thoroughly inspect the concrete or block foundation for any cracks or deterioration that may need repair. While checking the opening, it’s also a perfect time to confirm it meets local building codes, especially if it serves as an emergency exit. You can review official guidelines on egress window requirements to ensure your project is up to standard. Finally, use a wire brush and a shop vacuum to remove every bit of loose debris, dust, and old sealant. A perfectly clean, sound opening is essential for a secure, watertight installation.
Step 2: The Professional Installation Process
Once the old window is out, the next phase is where precision and professional technique are absolutely critical. When our teams install new basement windows, we follow a meticulous process focused on three core principles: leveling, securing, and sealing. Each step methodically builds upon the last to create a fully integrated, weatherproof unit that protects your home. Following this professional standard is the key to preventing the drafts, leaks, and energy loss that often result from an improper installation.
Preparing the Opening and Test-Fitting the New Window
A flawless installation starts with a flawless foundation. Before the new window is even touched, our technicians inspect and prepare the rough opening. We repair any minor chips or cracks in the surrounding masonry to ensure a smooth, stable surface. A waterproof membrane or specialized flashing tape is then applied to the sill, creating a crucial barrier against moisture intrusion. Finally, we perform a “dry fit,” placing the new window into the opening without sealant to confirm a perfect, snug fit.
Setting, Leveling, and Securing the Window
With the opening prepared, we apply a thick, continuous bead of high-quality polyurethane caulk to the interior perimeter. This creates the primary watertight seal. The new window is then carefully pressed into the caulk bed. For a clear visual of this critical stage, many find a detailed step-by-step installation guide to be very helpful. Using shims, our installers meticulously adjust the unit until it is perfectly level and plumb. Once positioned, the window is permanently secured to the foundation with durable masonry screws, ensuring it remains stable for decades.
Insulating and Air Sealing for Maximum Efficiency
The final step is to create a complete thermal barrier. The small gap between the new window frame and the foundation is carefully filled with a low-expansion insulating foam. We use this specific type of foam to avoid over-expansion, which can bow the window frame and compromise its operation. This crucial air-sealing process is what stops drafts in their tracks and is fundamental to achieving the high energy efficiency you expect from a quality window replacement.
Want this done perfectly by a team you can trust? Schedule Your Free Window Galaxy Estimate.
Step 3: Finishing Touches for a Watertight Seal
Your new basement window is in the opening, but the project isn’t finished yet. This final stage is what separates a standard installation from a professional, long-lasting one. Proper finishing is about more than just aesthetics; it’s about creating an impenetrable, watertight seal that protects your investment, your foundation, and your peace of mind from moisture for years to come. We believe in finishing every project with precision and care, because quality workmanship is a promise we always keep.
Exterior Waterproofing and Caulking
This is your home’s primary defense against water intrusion around the new window. With a steady hand, apply a continuous bead of high-quality, weatherproof silicone caulk around the entire exterior perimeter where the window frame meets the foundation. For a perfect seal, immediately “tool” the caulk line with a smoothing tool or a wet finger. This presses the sealant firmly into the gap, ensuring a complete, durable, and clean-looking barrier against the elements.
Installing or Repairing the Window Well
A functional window well is critical for directing water and keeping soil away from your window. When you install new basement windows, ensuring the well is in top condition is non-negotiable for protecting your home.
- Secure Attachment: The well must be firmly bolted to the foundation wall, leaving no gaps for water to seep through.
- Proper Drainage: Fill the bottom of the well with several inches of clean gravel. This creates a drainage field that allows water to percolate down and away from the window.
- Add a Cover: A sturdy window well cover is a highly recommended addition to keep out rain, snow, leaves, and pests.
Interior Trimming and Finishing
Once the expanding spray foam insulation has fully cured, carefully use a utility knife to trim any excess so it sits flush with the interior wall. To achieve a clean, polished look, install new interior trim, casing, or jamb extensions. This covers the gap between the window frame and the drywall, creating a seamless transition. A final line of paintable caulk along the edges of the trim followed by a fresh coat of paint will complete the transformation, making the window a beautiful, integrated part of your basement.
These meticulous details are what ensure your project to install new basement windows not only looks fantastic but also performs flawlessly. For a stress-free installation handled with expert care from start to finish, contact the trusted professionals at Window Galaxy USA.
Common Mistakes to Avoid (And Why a Pro Helps)
While a DIY approach can be rewarding, the decision to install new basement windows comes with significant risks. Even a seemingly minor mistake can compromise your home’s structure, leading to water damage, energy loss, and costly future repairs. Understanding these common pitfalls helps clarify the value a professional installer brings to the project. At Window Galaxy, our entire process is built on precision and care to prevent these errors and guarantee a perfect installation every time.
Improper Measuring and Sizing
One of the most frequent DIY mistakes is ordering a window that’s either too small or too large for the rough opening. A window that’s too small leaves large gaps that are difficult to insulate and seal properly, creating drafts and entry points for pests. A window that’s too large simply won’t fit, leading to project delays and the cost of a replacement. Our technicians take meticulous, double-checked measurements to ensure your new window is a perfect, custom fit for the space.
Forgetting to Level and Plumb
A window must be perfectly level (horizontal) and plumb (vertical) to function correctly. If it’s even slightly off-kilter, it won’t open, close, or lock smoothly. This puts constant stress on the frame, hinges, and locking mechanisms, causing premature wear and eventual failure. We use professional-grade levels and shims to guarantee your window operates flawlessly from day one, protecting your investment for years to come.
Poor Waterproofing and Sealing
This is arguably the most critical step in a basement window installation. An improper seal is a direct invitation for water intrusion, which can lead to foundation damage, dangerous mold growth, and rot. Many DIY projects fail because the wrong type of caulk or expanding foam is used, which can break down when exposed to moisture and temperature changes. Our team uses premium, industrial-grade sealants specifically designed to create a durable, watertight barrier between your foundation and the window frame. Avoid the headaches and protect your home. Let the experts at Window Galaxy handle it.
Hiring a professional isn’t just about convenience; it’s about ensuring the job is done right the first time. It’s an investment in your home’s security, energy efficiency, and long-term value. We keep our promises by delivering a stress-free experience and a result that exceeds your expectations.
Trust the Experts for Your Basement Window Installation
As this guide shows, the process to install new basement windows is a detailed project that demands careful planning, precise removal of the old unit, and a flawless, watertight seal to protect your home. While it may seem straightforward, avoiding common mistakes like improper measurements or inadequate insulation is crucial for achieving long-term energy efficiency and preventing costly water damage.
This is where our professional, customer-centric approach makes all the difference. At Window Galaxy, we provide professional project management from start to finish, ensuring a stress-free experience. Our team is fully licensed and insured in NJ, PA, CT, NY, & DE, and we only use high-quality, energy-efficient Galaxy Vinyl Windows for a beautiful and lasting result. We keep our promises, delivering quality workmanship and nonstop communication every step of the way.
Ready for a stress-free installation? Schedule your free, no-obligation estimate today! Let us help you transform your basement into a brighter, more comfortable, and secure space.
Frequently Asked Questions About Installing New Basement Windows
How much does it cost to have a new basement window installed?
The cost to install a new basement window can range from $750 to over $2,500 per window. This price is influenced by the window material, its size, and the project’s complexity. A simple replacement is more affordable, while enlarging a concrete opening will be on the higher end. At Window Galaxy, we provide honest, detailed estimates during a professional consultation to ensure you understand all the costs involved, with no surprises.
Can I make my basement window opening bigger?
Yes, making a basement window opening bigger is an excellent way to add more natural light or create a legal egress window for safety. This process involves cutting into your home’s foundation and is a structural alteration that requires professional expertise. Our team performs this work with precision and care, ensuring the structural integrity of your home is maintained while delivering the beautiful, larger window you envision. We handle the entire complex process for you.
What are the best, most durable window materials for a basement?
For basements, vinyl windows are the superior choice. Vinyl is completely moisture-resistant, meaning it will not rot, rust, or warp in a damp environment. This material is also highly durable, energy-efficient, and requires very little maintenance, making it a practical, long-term solution. Our high-quality vinyl windows provide a sturdy, reliable barrier against the elements, keeping your basement dry and secure for years to come. We believe in providing products that last.
How long does a professional basement window installation take?
A standard basement window replacement is a very efficient process for our professional team. A single window installation typically takes just 2-4 hours from start to finish. If your project involves multiple windows, we can often complete the entire job within one day. We are punctual, respectful of your home, and maintain nonstop communication throughout the project, ensuring a smooth and stress-free experience that works with your schedule.
Do I need a permit to install a new basement window in New Jersey?
In New Jersey, a permit is not typically required when replacing a window with a new one of the same size. However, a permit is almost always necessary if you plan to install new basement windows by creating a new opening or enlarging an existing one. Navigating local codes can be complex, which is why our dedicated project managers handle the entire permitting process for you. We guarantee all work is fully compliant, giving you complete peace of mind.
How do I stop my basement windows from leaking?
Persistent leaks from basement windows are usually caused by failed seals or an improper initial installation. While patches may offer a temporary fix, the only permanent solution is professional replacement. A quality installation focuses on creating a perfect, watertight seal with premium-grade caulking and correct flashing. This critical step ensures water is directed away from your foundation, permanently solving the leak and protecting your home from moisture damage.